To begin with, this usually occurs in the process of setting up the loom after the heddles are threaded, and the reed sleyed and fitting into the beater. You could do it either before or after you tie on to the cloth beam rod, but definitely before you try check the sheds for threading errors, because you simply can't do otherwise!

Before you get under the loom, the first thing you'll want to do is sit on the bench and find the center of your warp and part the two sides with your hands so that you create a space on the bottom harness sticks for the ties to be put on exactly in the center. This helps the mechanics of the harness movements be direct and efficient, which will help give you a clean shed. The harness will pull down straight from the center, rather than being cockeyed and wanting to twist.

Then you'll get under the loom with your ties for the harnesses and the treadles; you'll need four of each. The harness ties are long-ish lengths of cotton cord* (clothesline works well). To fit a harness with a tie, you'll fold the cord in half as shown, so that there's a loop formed at the halfway point.

Next, you'll bring that loop over the bottom harness stick as shown, making sure that you bring the cord under the heddle safety tie so that you don't bind it up. I also set each harness up the same way, so that the leads are all acting in the same manner.

Then you'll feed the two tails of the cord through the loop as shown. This knot is called a Lark's Head. There are a couple of different ways to make this knot, as I'll show in the next sequence of photographs. The one you just made is from an open ended loop. The next two will be from a closed end loop.

Then I cinch the Lark's Head up snug on the harness stick, and do all of them in the same way.

Then I'll move to getting the treadle ties ready. A treadle tie is the same cotton cord length, but with an overhand knot tieing the two tails together, so the whole piece will form a big loop. Each treadle will have one of these tied to it by another Lark's Head, so to start this knot, simply slip the loop under the treadle as shown. For the sake of description, the knotted end in this case is on the right side, and the loop end is on the left side.

To make the Lark's Head around the treadle, simply slip the loop end under the knotted end and cinch it up. You will then have a Lark's Head knot around the treadle, with the knotted end down on the treadle and the loop end coming up towards the harness.

Now comes the really cool part. You're going to make another Lark's Head out of the loop end of the treadle tie. I slip my right thumb and forefinger into the loop end as shown, and hold the tails with my left hand.
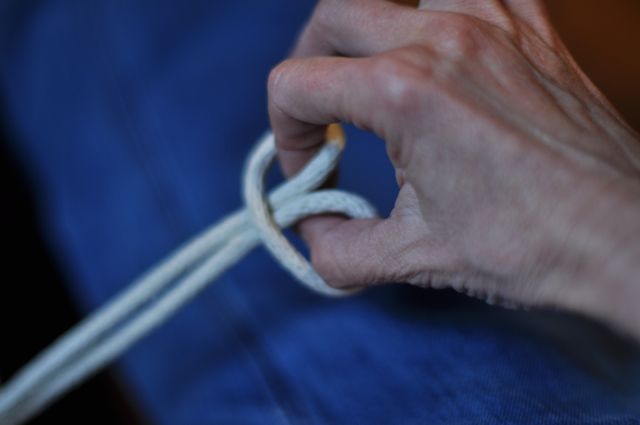
I probably should have taken another photograph, but I'll just talk you through this movement. It's so cool that's it's like a magic trick, that once mastered is easy and simple and such a fun movement to execute, so bear with me. To create this new Lark's Head out of a closed loop, hold the tails with your left hand, and spread your the thumb and forefinger of your right hand (which are in the loop end) apart from each other so thy go out over the top of the cord and to the sides. Then rotate your right hand (and spread thumb and forefinger) to the left and downward, so that the end of the loop is now on top of and crossing the tails. Your thumb and forefinger will now each be enclosed in new loops, as shown.

With your right forefinger, pull the two tails up through to form the new Lark's Head from the closed loop! So neat, huh?

To tie a harness to a treadle, simply slip the tails of the harness tie through the Lark's Head loop at the top of the treadle tie.

Then figure out the height you want to have the treadle from the floor and cinch up the Lark's Head on the tails to keep it in place in the location you choose.

To keep this from slipping out, next simply tie an overhand knot against the Lark's Head with the two tails.

And then tie a slip knot against that overhand knot.

And here is the entire finished tie-up, top to bottom.
Hopefully this has been descriptive enough to really help.
*There is also an efficient tie-up for texsolv cord, if you prefer to use that, but I'll treat that in a separate article.
This is exactly the information I need this afternoon as I tie up my new old loom. Thank you so much!
ReplyDeletegood information,thanks
ReplyDeleteTo: All
ReplyDeleteIs it possible to view the pictures that accompany the text of "The Harness-to-Treadle Tie-Up for Barn Looms" blog post? That would be very useful.
From: A new weaver with a new loom and no experience with tie ups.